
I’ve been asked a few times about my custom front-end for my Domoticz, Hue and Sonos setup, so here are a few HTML snippets and where to put them, assuming you are running Domoticz on your home control server.
Right from the offset I must stress that the Icons I have used are made by various incredibly skilled designers at http://www.flaticon.com/ and therefore this front end cannot be used for any commercial purpose.
I have previously written an extensive post about the continuous development of a home control user interface and have posed a video containing my front end, so this post will not be about the thought process behind creating a UI, rather how I have managed to put one together using HTML.
I must also stress that I am not an expert in baking a web app. Developers may read my code and scoff at its inefficiency but it works for me, and hopefully can give you some inspiration.
Layout
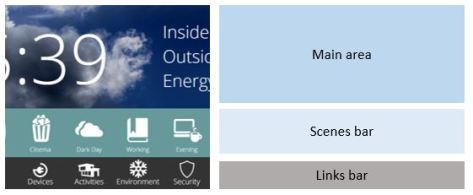
The layout of all panels follows the same template: A main area where the actual buttons and controls live, changing depending on which screen the user selects; the ‘scenes’ bar, a blue strip towards the bottom of the display which is a kind of ‘quick access’ ribbon for regularly used commands; and a Links bar which permanently shows the pages that can be displayed.
There is also a ‘notifications’ display which shows up just above the scenes bar with information provided by a variable in Domoticz. This text can be ‘cleared’ by touching it (more on this later).
All screens use variations on the same HTML so not every screen is shown in detail in this post.
Home Screen
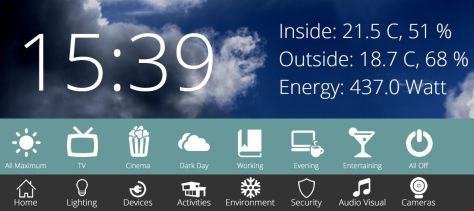
Home is where the heart is. I like the home screen to be simple, uncluttered and good looking. It’s by far the screen shown most regularly so less is more here.
The interesting part of this screen is the background. It changes depending on the weather. First I saved six 2000×600 backgrounds with names ranging from weatherback-rain.png to weatherback-fog.png. You need cloudy, fog, partlycloudy, rain, snow and sunny. I set the size of these backgrounds to fit the tablet which the screen is displayed on so you may need to adjust accordingly.
The HTML code to change the background depending on the weather is as follows (change xx, yyyy and zz to the address of your Domoticz server, the port Domoticz is using and the idx code of your weather source in Domoticz):
function updateweather(){

                var forecast

                var xmlhttp = new XMLHttpRequest();

                var url = "http://192.168.1.xx:yyyy/json.htm?type=devices&rid=zz";

                var forecast

                xmlhttp.onreadystatechange = function() {

                 if (xmlhttp.readyState == 4 && xmlhttp.status == 200) {

                 var myArr = JSON.parse(xmlhttp.responseText);

                                                forecast = myArr.result[0].ForecastStr;

                                                console.log("Forecast is " + forecast + ".")

       // myFunction(myArr);

                                                 if (forecast == "Partly Cloudy") {

                                                 document.getElementById("weatherindicator").src = "weatherback-partlycloudy.png";

                                                                }

                                                 if (forecast == "Sunny") {

                                                 document.getElementById("weatherindicator").src = "weatherback-sunny.png";

                                                                }

                                                if (forecast == "Rain") {

                                                 document.getElementById("weatherindicator").src = "weatherback-rain.png";

                                                                }

                                                if (forecast == "Fog") {

                                                 document.getElementById("weatherindicator").src = "weatherback-fog.png";

                                                                }

                                                if (forecast == "Snow") {

                                                 document.getElementById("weatherindicator").src = "weatherback-snow.png";

                                                                }

                                                if (forecast == "Cloudy") {

                                                 document.getElementById("weatherindicator").src = "weatherback-cloudy.png";

                                                                }

                                                }

                }

xmlhttp.open("GET", url, true);

xmlhttp.send();

setTimeout(updateweather,60000);

}
Notice that the last line of this code sets up the web page to update the weather picture every 60 seconds. Ok, in the body of your HTML you’ll need something like
<div id="weatherdisplay" align="left" class="weatherback"><img id="weatherindicator" src=""></div>
And you’ll need something like this wherever you save your CSS:
div.weatherback {

    position: fixed;

    top: 0px;

    left: 0px;

    width: 1000px;

                height:600px;

}
Activating Hue scenes
The API for Hue is relatively easy to use. I used the API to save scenes to each room and then can recall them from the press of an icon on the scenes bar. The HTML at the scene bar is easy:
<a href="javascript:;" onClick="groupscene(1,7);switchoff(24)"><img src="scene-cinema.png" width="150" height="150" border="0"></a>
The button called scene-cinema.png does two things actually, sets the group 1 to scene 7 and then switches of a switch in Domoticz. Let’s see the code for each of these functions:
function groupscene(group,scene){

                execute('PUT', 'http://192.168.1.aa/api/bbbbbbb/groups/'+group+'/action', '{"scene":"'+scene+'"}');

}
Change aa to the address of your Hue bridge and bbbbbb to the name of the developer (if you followed the Hue API instructions from the Hue website this might be “newdeveloper”. If your scene does not change straight away then your control panel might not be authorised to the Hue bridge. If this is the case, press the button on the Hue bridge and then try again a couple of times.
function switchon(devicecode){
execute('PUT', 'http://192.168.1.xx:yyyy/json.htm?type=command¶m=switchlight&idx='+devicecode+'&switchcmd=On', '');
}
function switchoff(devicecode){
execute('PUT', 'http://192.168.1.xx:yyyy/json.htm?type=command¶m=switchlight&idx='+devicecode+'&switchcmd=Off', '');
}
function toggle(devicecode){
execute('PUT', 'http://192.168.1.xx:yyyy/json.htm?type=command¶m=switchlight&idx='+devicecode+'&switchcmd=Toggle', '');
}
function dim(devicecode,dimlevel){
execute('PUT', 'http://192.168.1.xx:yyyy/json.htm?type=command¶m=switchlight&idx='+devicecode+'&switchcmd=Set%20Level&level='+dimlevel, '');
}
The above codes (again change xx to the address of your Domoticz server and yyyy to the port number) are all similar. Switchon, switchoff do what they say on the tin. Toggle changes the state of an on/off switch and then dim sets a certain switch you specify (idx) to the dim level you select (dimlevel).
While we’re here, here’s a list of the other Hue functions I put into the home control system:
function lightoff(light){

                execute('PUT', 'http://192.168.1.aa/api/bbbbbb/lights/'+light+'/state', '{"on":false}');

}
function lightmax(light){

                execute('PUT', 'http://192.168.1.aa/api/bbbbbb/lights/'+light+'/state', '{"on":true,"bri":255,"sat":0,"hue":0}');

}
function briup(group){

                execute('PUT', 'http://192.168.1.aa/api/bbbbbb/groups/'+group+'/action', '{"bri_inc":40}');

}
function bridn(group){

                execute('PUT', 'http://192.168.1.aa/api/bbbbbb/groups/'+group+'/action', '{"bri_inc":-40}');

}
function groupcontrol(group,hue,bri,sat){

                execute('PUT', 'http://192.168.1.aa/api/bbbbbb/groups/'+group+'/action', '{"on":true,"bri":'+bri+',"sat":'+sat+',"hue":'+hue+'}');

}
function groupscene(group,scene){

                execute('PUT', 'http://192.168.1.aa/api/bbbbbb/groups/'+group+'/action', '{"scene":"'+scene+'"}');

}
So these are the main components of the home page – and here’s a snippet of how I go the inside and outside temperature (change zz to the idx of your temperature sensor):
function updateintemp(){

                var instatus

                var xmlhttp = new XMLHttpRequest();

                var url = "http://192.168.1.xx:yyyy/json.htm?type=devices&rid=zz";

                xmlhttp.onreadystatechange = function() {

                if (xmlhttp.readyState == 4 && xmlhttp.status == 200) {

               var myArr = JSON.parse(xmlhttp.responseText);

                                                instatus =  "Inside: " + myArr.result[0].Data;

                                                console.log(instatus)

                                                document.getElementById("intemp").innerHTML = instatus

                }

                }

xmlhttp.open("GET", url, true);

xmlhttp.send();

setTimeout(updateintemp,20000);

}
You need a div with id “intemp” positioned where you like, and again the last part of the above code sets up the web app to update the temperature each 20 seconds.
Devices screen
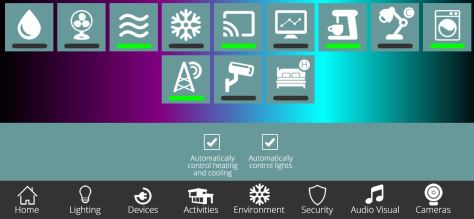
The devices screen updates the icons with a green bar when the switch is on and a grey bar when off. I save two identical png pictures, one with -on.png at the end and one with -off.png. I enter this HTML repeatedly, changing the id and the source of the picture for each button:
<a href="javascript:;" onClick=”toggle(xx)"><img src="chesterlampoff.png" width="125" height="125" hspace="5" vspace="5" border="0" id="chesterlamp"></a>
Change xx to the idx of the device in Domoticz (you can find the idx of the device in the ‘Devices’ tab of the Domoticz interface.
Change the id=”chesterlamp” to id=”whateveryourdeviceiscalled” then change the img src to the ‘off’ picture for your device.
In the code part you need the following:
function updatedevice(idx,location,onimage,offimage){

                console.log("checking status of idx "+idx)

                var xmlhttp = new XMLHttpRequest();

                var url = "http://192.168.1.94:8080/json.htm?type=devices&rid="+idx;

                var onoff

                xmlhttp.onreadystatechange = function() {

                if (xmlhttp.readyState == 4 && xmlhttp.status == 200) {

               var myArr = JSON.parse(xmlhttp.responseText);

                                                onoff = myArr.result[0].Status;

       // myFunction(myArr);

                }

                                if (onoff == "On") {

                                document.getElementById(location).src = onimage;

                                }

                                if (onoff == "Off") {

                                document.getElementById(location).src = offimage;

                                }

                                if (onoff == "Open") {

                                document.getElementById(location).src = onimage;

                                }

                                if (onoff == "Closed") {

                                document.getElementById(location).src = offimage;

                                }

                }

xmlhttp.open("GET", url, true);

xmlhttp.send();

}
Then another function where you will put all the code to tell the web app to update the icons depending on how Domoticz reports the switch (on or off, or even open or closed if you’re using door sensors too):
window.setInterval(function(){

                updatedevice(187,'chesterlamp',"chesterlampon.png","chesterlampoff.png");

                updatedevice(132,'washingmachine',"washingmachineon.png","washingmachineoff.png");

                countup();

                updatenotification(11)

                }, 1000);
I’ve put two switches here, Chester’s lamp and the washing machine. You can add as many switches as you like here, as long as they have been set up in the body of the HTML.
There are two other functions that are called each second too: countup() and updatenotification(11)
Automatically reverting to the Home Screen
If you want the screen to revert to home after two minutes of inactivity, you can use this code:
First put
var ticker = 0;
at the start of your code block, then put:
function countup(){

                ticker=ticker+1

                console.log("Ticker is " + ticker);

                if (ticker>120) {

                                console.log("Moving to index...")

                                MM_goToURL('self','index.htm');

                                }

                }
This means that once the variable ‘ticker’ has incremented to 120, the screen will go to the page called index.htm. If you use this code, remember to put this at the end of each function:
ticker = 0;
This will reset the timer so that another 2 minutes have been added to the time before the page will switch to the Home Screen.
Notifications from Domoticz
I have set up the screens to show a strip which indicates what Domoticz is up to. Some of my LUA scripts in Domoticz update a variable with a string of text in English to tell the user what Domoticz is doing. This could be confirmation that a switch has been turned on/off or it could report is something has been triggered automatically.
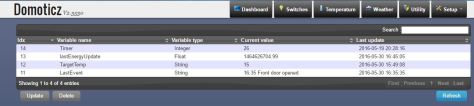
First, create a string variable in Domoticz called LastEvent and then note down its idx. In the below case the idx is 11 (and there’s already a string update in there too, yours will be empty when you first set it up).
Back to the home control HTML:
function updatenotification(idx){
console.log("checking status of idx "+idx)
var xmlhttp = new XMLHttpRequest();
var url = "http://192.168.1.xx:yyyy/json.htm?type=command¶m=getuservariable&idx="+idx;
var textentry
xmlhttp.onreadystatechange = function() {
if (xmlhttp.readyState == 4 && xmlhttp.status == 200) {
var myArr = JSON.parse(xmlhttp.responseText);
textentry = myArr.result[0].Value;
// myFunction(myArr);
document.getElementById("notification").innerHTML = textentry;
}
}
xmlhttp.open("GET", url, true);
xmlhttp.send();
}
And:
function clearnotification(idx){
execute('PUT', "http://192.168.1.94:8080/json.htm?type=command¶m=updateuservariable&idx="+idx+"&vname=LastEvent&vtype=2&vvalue=%00", '');
}
And in the body of the HTML (so once the text is clicked the variable in Domoticz is reset to null):
Something like this for the CSS:

div.notificationpane {

    position: fixed;

    bottom: 250px;

    left: 0px;

                width: 100%;

                font-size: 30pt;

                background-color: #333333;

                text-indent: 25px;

                opacity: 0.6;

}
Then in the LUA script, when you want to notify the user about something, you can add a line like this:
commandArray['Variable:LastEvent'] = tostring(os.date("%H") .. ':' .. os.date("%M") .. ' Rear balcony door opened, lights on for 15 minutes.')
This adds the time and the text to the variable, which then almost immediately pops up on the Home Control screen until it is clicked.
Where to store your HTML
When you have created your masterpiece, you can save it in a new folder of your choice below the /domoticz/www/ folder. You can use something like WinSCP to create a folder and then transfer all your files in one go.
Then, when you usually navigate to 192.168.1.1:8080 to go to the Domoticz home screen, add / then the name of your folder then /index.htm or whatever your home screen address is.
Summary
Due to the jerry-rigged nature of my HTML code I am not going to publish it in its entirety. I also don’t know the ins and outs of using the flaticons.com icons and publishing them directly. Hopefully, however, this post will give you some inspiration to write your own home control front end.

Fantastic and excellent Guide 🙂
Now to find all the images and have a play!
LikeLike
Hi,
Looks great. Can I steal your code?
Cheers,
Lex
LikeLike
Sure, send me your email address and I will send over.
LikeLiked by 1 person
I’d love this too !
LikeLike
Hi, sent to you just now. If the email does not appear check your spam. Also if you don’t have a gmail account it may not come through so reply with a gmail account to get it. Thanks for your comment! Harry
LikeLike
Hi fountside nice job can you send me too the zip file please at […]
thanks
LikeLike
Hi, sent to you just now. If the email does not appear check your spam. Also if you don’t have a gmail account it may not come through so reply with a gmail account to get it. Thanks for your comment! Harry
LikeLike
Lex that email is not working.
LikeLike
Sorry, neither of the email addresses you gave me worked.
LikeLike
Both email addresses get sent back to me with postmaster delivery failures. It could be the size of the zip? I have sent the file to Hotmail addresses before.
LikeLike
Try getting a Gmail address and I will send to that one. As above, I have sent the zip but is was not to a Hotmail email, it was a Gmail address.
LikeLike
[…]
LikeLike
Your efforts are appreciated!
LikeLike
Really nice!
Would you mind sharing the design/framework to another? =)
LikeLike
Hi, yes if you have a Gmail address I can send it, the zip is too large for other email providers.
LikeLike
I’m not sure if my first try to reply was successful since depending on how I check the comments my previous comment is not visible. =)
LikeLike
Hi, check your spam folder. I will try again to the gmail account you sent.
LikeLike
You are indeed correct. 🙂
It was in my spam folder. Thanks again! I’ll probably fiddle with it during the week.
LikeLike
I have read and I really like this solution. I use Domoticz every day. Please share me your code.Thanks.
LikeLike
Hi, I’ll send it to your gmail account now.
Thanks for your interest! Harry
LikeLike
Hi, this UI is brilliant! Would you possibly be able to share your code?
Many thanks!
LikeLike
Hi Shane, yes that’s fine. Can you give me a gmail account to use as I’ve not been able to send the 12MB zip to hotmail in the past. Thanks, Harry
LikeLike
Hi,
Great work! really appreciate youre clean design, would you be so kind to pass me the code also?
Many thanks
LikeLike
Hi, I have just sent it. Thanks Leo for your comments!
LikeLike
Wow, a very nice howto! The UI is very very Nice!
Would you mind sharing it? I would love to use it as a starting point for creating a web UI.
Best regards,
Mark
LikeLike
Thanks Mark, I have sent the zip to your gmail address.
LikeLike
I have received them, thank you!
LikeLike
I like your UI, can i get the theme/code? 🙂
LikeLike
Thank you Mr T! I have sent the zip to your gmail. Good luck deciphering it! Harry
LikeLike
Very nice work and inspiring posts! Is it possible to receive a copy of your code as well?
I’m also using domoticz as the foundation for much of my homeautomation to which i have interfaced rfxcom 433Mhz, MQTT (arduinos and esp8266) and 2.4GHz using MySensors.org. Currently I use EmonCMS for trending and as historian/dashboard parallell to domoticz.
So far i have not managed to find a simple UI where I can merge everything and achieve a high enough WAF (Wife Acceptance Factor)…
Would be interesting to have a look on how you strutured your code and pages as reference since I’m a rookie in webprogramming.
Best regards
/T
LikeLike
Thanks Thomas, I’ll send you the files now although I should stress that the javascript probably could be more elegant but it certainly gets the job done. Hope your WAF remains at acceptable levels!
LikeLike
Wow this layout looks verry nice !! will u please send it to me 🙂
LikeLike
Hi, yes I’ll send it to you now. Thanks for your comment Dennis!
LikeLike
Verry nice UI!! Will you share your code ?
LikeLike
nice code can you share it ?
LikeLike
Sure.
LikeLike
Thnx a lot !!
LikeLike
Great UI. I found you’re site last night and was immediately in love of your GUi. This is the gui for Domoticz to how it much look.
Hope you want to send the code also to me.
LikeLike
Thank you for your response Michel! I have had many positive comments on this. I have sent you a zip of the files.
LikeLike
Hi, great work!!! If you are sharing your code can you send it to me at […] Love ur approach to HA!!
LikeLike
Thanks Boris – I appreciate it. Sent to you now. Hope it helps you in some way. Harry
LikeLike
Fabulous UI indeed. Great work.
Can you please share the code?
LikeLike
Hi, sent to you just now. If the email does not appear check your spam. Also if you don’t have a gmail account it may not come through so reply with a gmail account to get it. Thanks for your comment! Harry
LikeLike
Nice job on the blogs for Domoticz! Just started learning it for a myself when I found your blog. If you don’t mind sharing your code, would love to see it. Thanks!
LikeLike
Hi, sent to you just now. If the email does not appear check your spam. Also if you don’t have a gmail account it may not come through so reply with a gmail account to get it. Thanks for your comment! Harry
LikeLike
It looks very very nice. I would love to use this GUI.
Can you please send me the code
Greetings,
Gerwin
LikeLike
Hi, sent to you just now. If the email does not appear check your spam. Also if you don’t have a gmail account it may not come through so reply with a gmail account to get it. Thanks for your comment! Harry
LikeLike
After a long Searcy I found your website, amazing!! I really want to examine your codes, bit hoe do I knop wat your e-mail address is?
LikeLike
Hi, sent to you just now. If the email does not appear check your spam. Also if you don’t have a gmail account it may not come through so reply with a gmail account to get it. Thanks for your comment! Harry
LikeLike
Hi fountside – Your frontend look great. Im building a domoticz home automation. Would be great if could share it 🙂
Br Pierre
LikeLike
Hi, sent to you just now. If the email does not appear check your spam. Also if you don’t have a gmail account it may not come through so reply with a gmail account to get it. Thanks for your comment! Harry
LikeLike
Great work! Clean design, easy to use and almost every device can be integrated.
I’m currently working on something similar… Trying to combine some automation systems together in one simple GUI. Do you mind sharing your code?
LikeLike
Hi, sent to you just now. If the email does not appear check your spam. Also if you don’t have a gmail account it may not come through so reply with a gmail account to get it. Thanks for your comment! Harry
LikeLike
It really looks great and adaptable!! I also like to have a copy of the code if possible.
Thanks in advance!!!
//Magnus
LikeLike
Hi, sent to you just now. If the email does not appear check your spam. Also if you don’t have a gmail account it may not come through so reply with a gmail account to get it. Thanks for your comment! Harry
LikeLike
I’ve received it, thanks!
//Magnus
LikeLike
Hi,
I see that you are willing to share your code with others.
Do you mind and share it with me? Or maybe you can place a download link on your site?
With kind regards,
S
LikeLike
Hi, sent to you just now. If the email does not appear check your spam. Also if you don’t have a gmail account it may not come through so reply with a gmail account to get it. Thanks for your comment! Harry
LikeLike
Hi Harry,
Thanks for willing to share with me. But I haven’t receive your email yet.
My email address is a gmail.com address 😐
Can you sent is again?
With kind regards,
S
LikeLike
Sorry but your email is either rejecting my emails or it is in your junk folder. Check again please 😀
LikeLike
Hi, very nice. It’s exactly what I expected.
I have the same hardware : raspberry Pi with RFX433 (for motion sensors and piloted plugs) and NodeMCU diy thermal sensors and relays for heating.
I want to have a wall mounted screen to manage my system and display main informations too.
Can you send me your code please ?
Thanks a lot.
David
LikeLike
Hi, sent to you just now. If the email does not appear check your spam. Also if you don’t have a gmail account it may not come through so reply with a gmail account to get it. Thanks for your comment! Harry
LikeLike
Hi, very nice
Can you send me your code please ?
Thanks a lot
sebastien
LikeLike
Hi
Your layout is very cool, can youplease share it with me?
Thanks in advance.
LikeLike
Sent to you Bjørn and thanks for your comments.
LikeLike
Hi, this looks very nice! would you share your code? Thanks a lot!
LikeLike
Thanks for your comments, I have sent to you now.
LikeLike
Hi fountside
Awesome design, one that my wife actually does approve of. Would you be able to share, like you have with others? Thank you so much for creating a great, modern UI!
LikeLike
I’m glad your wife approves! I was not satisfied with anything on offer to create a stylish UI that all the family could use instinctively hence why I made my own. Maybe you can improve on it further… let me know how you get on. Harry
LikeLike
Hi Harry
I havent received it. Would you be able to provide a download link or send a .zip file? Much appreciated.
Thank you
-Jason
LikeLike
Never mind caught in spam
Thanks again! If I make any strides I’ll share.
LikeLike
A very nice and clean UI. Compliments!
Can you please share it wi me too?
Thanks
LikeLike
Sent! Thanks for your compliments!
LikeLike
hi Harry, what an amazing good inteface for Domoticz you have created! Would like to ask if I can get a copy of your files to give it a try me self.
thanks in advance
Bas
LikeLike
Hi Bas and thank you. I have just sent to zip to you. Harry
LikeLike
Hi Fountside,
Your webpage looks great! I am also fiddeling with creating a webfront for my Domoticz setup. Is it possible you would share your code with me? Thanks in advance. A happy dutch Domoticz user.
LikeLike
Hello Patrick, thanks for your comment. I have sent you the zip file now. Harry
LikeLike
Hi can you send the code to me to?
LikeLike
Yes! Sent now, thanks. Harry
LikeLike
Wow! I love your UI. Is it possible to get a copy??
Thanks in advance.
Alex.
LikeLike
Thanks for your interest Alex. I have sent it over now.
LikeLike
Hi
Do you mind and share it with as well?
Many thanks
LikeLike
No problem Leo, thanks for your comment. The zip file should be in your inbox now. Harry
LikeLike
Great stuff – any chance of this zip file?
LikeLike
Hi, yes I’ve sent to your gmail account. Thanks, Harry
LikeLike
hi,
nice guide could.you share src code?
best regards,
ulbj
LikeLike
Hi ulbj, thanks for your comments. I have forwarded the zip to you now. Harry
LikeLike
Hi Fountside,
a great job, congratulations.
Can I have a copy of your code? Thanks in advance
Alberto
LikeLike
Hi Alberto and thank you for your comments. I have emailed you the zip file. Thanks, Harry
LikeLike
Hi, great frontend !!
Could you please send me hte code, too ?
kind regards,
Michael
LikeLike
Hi Michael, thanks! Yes I have emailed you the html zip file now. Harry
LikeLike
Hi,
Great work! really appreciate youre clean design, would you be so kind to pass me the code also?
LikeLike
Hi, thanks for your feedback, sorry for the delay, I have been away for a month but back now. I have sent the zip to you. Harry
LikeLike
Hi. Awesome looking frontend…well done!! Would you be so kind to share your code to me too please?
LikeLike
Hi, sent now. If you don’t have it please message me again with a Gmail account. Hotmail accounts do not like the size of the zip. Thanks for your comments!
LikeLike
Hi, great project!
I really would like a copy of your html files. It could really help me get my frontend together!
Cheers,
Xander
LikeLike
Great comment Xander. Sent to you now and I’m sorry it has taken a while. Thanks for your support.
LikeLike
Hi, this is excelent. I was search domoticz custom skins .. but your “skin” is best. I want your code too 🙂 …. pls
LikeLike
Thanks very much Jan. Sent to you now.
LikeLike
Hi! Stumbled across your site after googling, I really like your design! Its timeless, simple and elegant. Moving from Fibaro to Domoticz and would like to upgrade the default design of Domoticz! Would you be so kind to share your code?
LikeLike
Thanks for your great comments Tommy! I have sent you the zip now and apologies for the delay.
LikeLike
Hello,
What an awesome interface, i would love to have a copy of the code if at all possible.
Great work!!
Klaus
LikeLike
Hi,
Awesome design, i would love to have copy of the code also.
LikeLike
Hi, thanks Klaus! I have sent you the zip. If it doesn’t arrive please message me again with a Gmail address,
LikeLike
Hi, I’d like your work. Can I have the code?
LikeLike
Thanks for your comments, I have sent the files now.
LikeLike
Hi, Nice work. Would you be so kind to pass me the zip also?
LikeLike
Sending now, thanks very much for your comments and apologies for the delay. You might also be interested in my newest blog post which shows my next version of a front end for Domoticz and a link to Github so you can download and start working on it instantly. Thanks again!
LikeLike